I still remember dreading the rain on my first hiking trips. It took about half a dozen overnight backpacking trips before I ended up getting rained on the first time. That experience was entirely unlike what I had imagined. I got a bit wet, my gear got a bit wet, and that was it. From then onward I lost that foreboding sense of dread wondering before each trip if I’d get rained on. Turns out it didn’t matter much.
More...
Don’t get me wrong, if you’re wholly unprepared for rain and you get soaked on a cold spring day it could lead to health-threatening situations. However, getting used to being rained on, making sure you’re safe, and keeping your gear in functioning order when wet is a relatively simple skill set.
Today we will walk through everything you need to know in order to choose the best waterproof hiking gear for you. From years of guiding trips in the backcountry, I’ve also run into a lot of situations and gained a lot of helpful tips. Don’t worry – I’ll hand those out like soggy backpacking party favors throughout this article.
What to Consider When Planning a Hike in the Rain
Do I need waterproof hiking gear?
Before we even get into talking about the details of waterproof gear let’s consider whether or not you even need it.
There’s a big misconception that every backpacker and every hike that you go on requires full waterproof gear. This is, most certainly, not the case.
Bear with me while we break this down. Waterproof hiking gear is made to keep water off the hiker and their gear. This is important if getting wet can be dangerous to you and your gear.
Now, if the weather is warm enough that getting wet isn’t dangerous then you may not need waterproof gear. If the equipment in your backpack is inherently waterproof, it may not need a waterproof bag to go inside.
I’m not going to give a list of geographic locations and situations for waterproof versus non-waterproof gear considerations. Instead, I just want you to think about where you’re hiking and what kind of weather you can reasonably expect during your hike.
How to Determine if You Need Waterproof Gear
I like to use the historical weather for the location I’m going to determine what I need.
Look up the average weather for your destination before going. What you want to know is:
For instance, if the average low is 75 degrees, the record low is 55 degrees, and the average rainfall is 0.34″ per month I may consider taking less rain gear.
If, however, the average low is 60, the record low is 28, and the average rainfall is 12.4″ per month I’m definitely taking full rain gear!
All this being said, I strongly recommend that you err on the side of caution. Being caught unprepared when the weather takes an unexpected turn can turn into a real life-or-death emergency!
If you have any doubt, please take extra gear instead of less gear. As you gain experience, training, and knowledge you may pare down later.
Essential Waterproof Hiking Gear
Time to open up the can of worms! Let’s take a look at all of the waterproof gear you might need or must have on the trail.
Waterproof Gear Storage Systems
Another common mistake I see new backpackers making is to put literally everything into waterproof stuff sacks. There’s nothing inherently problematic with this, but it’s extremely inefficient in terms of weight and economics.
Here are the two waterproofing systems I recommend due to their efficiency, effectiveness, and weight savings.
Full Bag Liner
A waterproof backpack liner is a great system if you want to keep everything in your bag safe from rain. Here’s how you can use this simple method.
Don’t overthink this – all you need is a heavy-duty trash bag liner.
Stuff that bag liner all the way to the bottom of your empty backpack.
Now start shoving anything in there that you don’t want to get wet. For me, this is typically my sleeping bag or quilt, and any clothing I’m not using for the day.
When that’s done, spin and twist the top closed as you push out any excess air. Tuck this little tuft of plastic over the edge and pinch it between the plastic liner bag and your backpack.
Now you’re done – you’ve got a waterproof, reliable, and effective liner bag.
This method can be, by far, the lightest weight and cheapest method for waterproofing your gear if done right.
Pro Tip
I’ve used this system and made a single bag last multiple trips. When packing other things around your bag be careful to keep things away from it that might poke holes or tear into the bag.
Pro Tip #2
Carry a second trash bag liner in case you need a replacement. They weigh almost nothing and cost almost nothing. Plus, the trash bag makes a good backup emergency rain poncho, ground tarp, or waterproof cover for your sleeping bag (I’ve used them for all of these purposes). I never leave for the trail without a backup trash bag in my backpack.
Waterproof Stuff Sacks

My second favorite method, and the current method I use, is multiple stuff sacks for waterproofing.
When using waterproof stuff sacks I can pull all my gear out and throw it right in the mud without worrying about it (not suggesting you do this). While the bag liner method is simple and cheap, it can be tricky to dig things out if you have to without getting your stuff rained on in some situations.
Individual stuff sacks can also be nice and easy for staying organized when packing and on the trail. I’ve tried both methods and found the stuff sacks to be my current preference.
Stuff sacks weigh a bit more than just using a cheap bag liner. They also cost more. These are just tradeoffs you’ll want to consider.
Remember, you don’t need a stuff sack for everything in your bag. I use a stuff sack for my sleeping bag or quilt. I also use one for my clothing that isn’t being used for the day and my food (doubles as a critter bag). That’s it!
If you want stuff sacks for other items you can go cheaper and get non-waterproof bags for organization. Non-waterproof bags are typically lighter and cheaper as well so you can save yourself the trouble!
I personally like the Sea to Summit eVac Stuff Sacks. They’re not quite “ultralight” but you can get every last bit of air out of them which is really nice when you’re packing small backpacks with confined space requirements like my 30L summer bag.
Waterproof Upper Clothing

Notice I didn’t say “waterproof jacket”. That’s because there’s an incredible number of different options for keeping our upper half dry on the trail.
Here are some options for waterproof uppers:
I think a waterproof jacket is probably the most foolproof universal choice. While we could write an entire article just about the waterproof jacket, I’ll keep it simple here.
When buying a waterproof jacket I suggest you keep it simple. I avoid waterproof breathable jackets for 3-season hiking. Over the years I’ve never found a breathable jacket that “breathes” well enough to keep you from getting swampy inside the jacket. For that reason, I prefer an alternative method of “breathing”.
My personal favorite waterproof jackets are lightweight non-breathable jackets with pit zips. Armpit vents can be opened up to dump loads of heat and sweat without letting in rain.
Currently, I recommend the Zpacks Vertice (available for men and women) for a few reasons.
It’s incredibly lightweight, has pit zips, and is made from breathable fabric so you really get the best of all worlds. The only real drawback is the price tag but investing in good gear is important.
Waterproof Ponchos
I think ponchos get swept under the rug WAY TOO QUICKLY by all hikers. When you open up Backpacker Magazine you see some people covered head to toe in modern-cut good looking brand name jackets and pants. This gear looks awesome, but it may actually be a step in the wrong direction.
During the summer, the most popular backpacking season by far, full waterproof jackets and pants can be a hindrance. Even the most breathable don’t let out sweat fast enough to avoid “swamping out” on a warm day. Many people just hike in the rain without their gear on at all.
What if there was a way to stay mostly dry when you need to but still have enough air movement to prevent the swamp butt? What if I told you that this super effective method can cost fractions of what top-end jackets and pants cost?
Waterproof ponchos are extremely versatile 3-season rain protection that I strongly encourage everyone to give serious consideration and they do all of these things. Benefits of backpacking ponchos include:
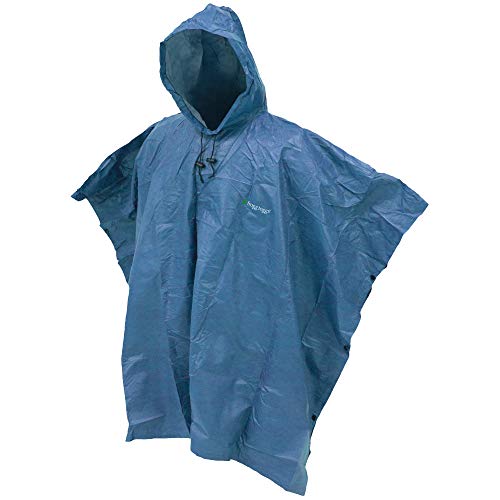
There are a lot of options out there but I think the FROGG TOGGS Ultra-Lite2 Waterproof Beathable Rain Poncho takes the cake. Its price point is probably 90% cheaper than the ultralight cuben fiber alternatives so I think the value can’t be beaten.
Yes, ponchos look dorky, but you’ll realize after a week or two on the trail that it’s not how cool your gear looks that will keep you going. Instead, what keeps you going is making smart, functional choices both on and off the trail.
When temps start to fall and getting wet can be a danger to your health, ponchos begin to lose viability for most backpackers.
**Please note that ponchos doubling as tarps or groundsheets is not a great idea for most backpackers. Typically I love ultralight gear and any gear that can serve more than one function. Not so with these. In fact, I encourage all but the most hardcore die-hard ultralighters to avoid these dual-purpose ponchos. They have quite a few functional drawbacks to offset their minimal benefits.
Waterproof Pants
Just like upper clothing, we get options when it comes to keeping our lower bits dry and warm.
Probably the most common and practical waterproof lower option is the waterproof pants.
When you buy waterproof hiking pants you need to make sure you can get them over your hiking footwear. The last thing you want to do is take off your boots or shoes while rushing to beat an incoming storm!
Look for zippered cuffs on your waterproof pants. These are crucial to getting your pants on in a pinch.
While there are many options out there, I recommend the Marmot Precip Pants (available for men and women) for general use and beginners. These pants have been around for decades in one form or another. They’ve always been good and have improved over time. I personally use these when the weather cools down and I feel they represent a perfect balance of affordability, reliability, and quality for most hikers.
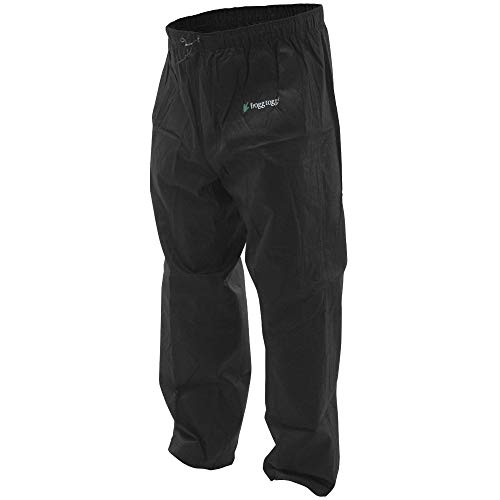
If you’re on a budget the Frogg Toggs rain pants are pretty popular. They would probably be a good fallback/budget choice particularly if you only hike a few days a year. Don’t expect them to hold up against a thru-hike though!
Waterproof pants are one of the pieces of gear where I won’t go ultralight. Ultralight fabrics are just too delicate to hold up against the abuse of being dragged through the brush, snagged on sticks, and beat up by off-trail bushes. While ultralight rain pants probably are a great choice for some hikers, I think the vast majority of the backpacking world can steer clear of them. Take durable rain pants when necessary and try to save ounces elsewhere.

Pro Tip
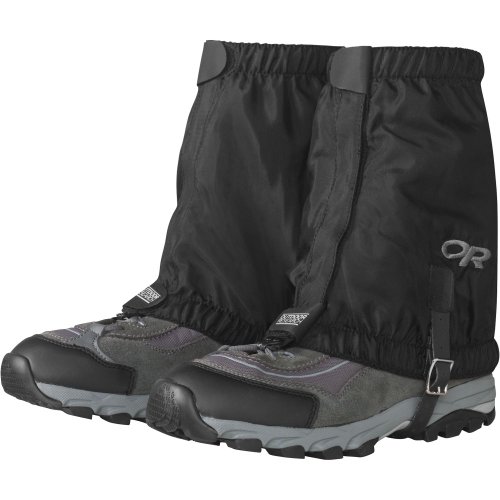
If you know you’ll be hiking off-trail through rugged brush, consider wearing gaiters. Outdoor Research gaiters are some of my favorites and end up in my bag whenever I’m doing serious time off-trail. Good gaiters really help reduce damage to your legs and your pants from scratchy brush!
In my backpack, during the summer months, I use a cuben fiber skirt/kilt and an old ultralight Marmot jacket. I find this to be the best combination for me most of the time during 3-season hiking but you’ll have to experiment to find your own perfect balance.
Pro Tip #2
During the warmest months you may not want or need waterproof lower clothing. When the mercury begins to drop, during the shoulder seasons, you probably should be carrying full-length waterproof pants.
Waterproof Tents
Yes, there are plenty of backpacking shelters out there. However, tents are probably the most conducive to new backpackers and cover the largest range of situations and preferences.
For today’s article, we’ll just be talking about waterproof tents. I highly encourage all backpackers to experiment with all shelter types at some point. You might be surprised how much you like different ones!
While it’s probably prudent to shell out some cash for a quality tent, this can also be a mistake. Spending your money on the right features is much more important than just buying the most expensive tent from this year’s Gear of the Year list.
Tent Weight
If you want a lighter tent you’ll need to spend more money – usually. Thinner fabric, more advanced materials, and better design all lead to lightweight tents.
Taking advantage of tents that use hiking poles as support members can help shave a ton of weight. I like tents from Lightheart Gear for this reason.
Remember that with lightweight tent fabrics comes… responsibility. You can’t shove it in your bag recklessly, set it up on jagged sticks, or pitch your tent like a goon if you’re using super-lightweight materials. You need to treat your gear with some respect and understand its inherent limitations.
It’s worth mentioning here that Dyneema composite fabric, or cuben fiber, can be orders of magnitude lighter than the next best competing fabric. It’s quite expensive and very weak to puncturing forces though it’s highly wear-resistant and crazy strong in tension.
Seam Sealing
Even tents from the biggest name brands seem to fail on this. I’ve seen poor seam sealing or failed seam sealing on everything from cheap tents to the high-end gear of pros.
Seam sealing is the act of waterproofing the seams on your tent. The waterproof fabric used for tents doesn’t hold up against the sewing machine needle. Once the final product is sewn together it has to be sealed along all the seams.
Seam sealing is usually done with seam tape. This tape is applied in the factory and uses a ribbon of adhesive, waterproof material to cover over the seams on your tent.
Unfortunately, this process is nearly always, and particularly on budget-oriented tents, the first area to fail. That’s why I often prefer ordering my tents without any seam sealing at all!
Cottage industry manufacturers often offer “non-sealed” tents. These are usually cheaper – since they don’t seal them at the factory. Plus, and most importantly, you can do the seam sealing yourself and make sure it’s done right and will last much longer than most factory jobs.
Sealing your own tent or tarp is actually pretty easy to do and costs very little – you can learn how in this great video. If, however, you don’t want to deal with that most quality cottage companies will offer good factory seam sealing for a price.
Tech Note
One of the advantages of cuben fiber, or Dyneema composite fabric, is that the seams are inherently waterproof. Dyneema composite fabric seams can be “welded” together using no stitching or thread which makes them inherently waterproof and very strong.
Fly-First Tent Pitching
One of the biggest drawbacks of traditional tents when pitching them in the rain is that, well, they get wet.
When you go to pitch your tent in a downpour you’ll have the interior completely soaked, often with standing water, by the time you get the fly put over it. This can be mitigated as you get faster at pitching. You can also just keep a microfiber towel on hand to mop out the interior (highly recommended).
Alternately, you could try a shelter where the rain fly gets pitched first. These include tarps, hammocks, and fly-first tents.
A fly-first tent means you can pitch the rainfly as a free-standing structure. Then you can put up the tent body underneath the standing rainfly, thereby keeping everything dry.
Of course, in the field, it’s nearly impossible to actually keep everything dry. A fly-first pitch can help though!
Maybe the most popular fly-first tents are the super heavy, super expensive, and super durable Hilleberg tents. To be fair, however, their tents are rated to stand up to some crazy weather conditions, and most are 4-season rated as well so this means they’ll always be a bit heavier than ultralight 3-season tents. Give them a look!
Today’s Best Waterproof Tents
There are a lot of good options these days for lightweight, affordable, waterproof tents. My personal overall favorite and most-often recommended is the LightHeart Solo from Lightheart Gear (also available in duo).
Their tents are lightweight, affordable, and made from a material that’s easy for general backpackers to use, maintain, and repair. You will have to use adjustable hiking poles in order to set up these tents, however, or order the tent poles with them.
If you don’t use hiking poles or just prefer a tent with good old tent poles then check out the Nemo Hornet 2. At 38 ounces it’s relatively lightweight for a full-featured tent and is loaded with techy goodies for the modern backpacker.
Of course, the best tent is the one that works perfectly for you.
I strongly recommend pyramid pitching tents/tarps as a great shelter with a ton of versatility. With a mid-pitch shelter like the MLD Solomid, you can put up your shelter (a mix between a rain fly and a tarp) and then get out of the rain (starting at 11 ounces!). Once inside you can set up a groundsheet, a bathtub style tent body, or any other sleep system you like.
Pyramid pitching shelters, tents, and tarps are awesome and give the user so much flexibility they’re hard to overlook! Thanks to the lack of excess material in mid-pitch tents they’re also incredibly lightweight if they fit your 1needs.
Non-Essential Waterproof Hiking Gear
Waterproof Gloves
Some of the hardest seasons to stay warm and dry are those cold shoulder season months. Think late fall and early spring when temps are cold and precipitation is wet. These are the days when getting wet and staying wet can lead to hypothermia or non-freezing cold injuries.
These are the times when waterproof hiking gloves make sense in your backpack and on your hands.
Remember, when you’re hiking you get to take advantage of that extra heat from body exertion. Overdressing can become problematic quickly as you overheat and need to strip layers off.
Occlusive Barriers
Maybe one of the best waterproof glove options is good old nitrile gloves. These gloves weigh nearly nothing at all. It’s easy to toss them into your backpack and keep them around for backup.
As long as you keep your exertion levels low, nitrile gloves can provide an occlusive barrier to keep your hands warm and dry. Over the top of them, you can wear any gloves you’d like whether they’re wet or dry your hands will stay quite warm.
While the true benefits of wearing an occlusive barrier glove may be difficult to achieve during shoulder season weather, they can make good emergency backup gloves if nothing else.
One of the best uses for nitrile gloves is in the winter. Nitrile gloves end up trapping a lot of sweat and moisture as you wear them. This is actually a benefit in freezing temperatures. Using nitrile gloves to trap sweat from your hands keeps your gloves dry which prevents the gloves from losing insulative ability.
This common trick among experienced skiers and snowboarders can easily be adapted for you to use during your own winter hiking!
Mitten Shells
Now, let’s move on to true one-piece waterproof gloves.
Just like with waterproof tents, seam sealing tends to be the weakest link in waterproof gloves. Personally, I like to spend a little more on waterproof gloves. I find it’s an area of gear where higher quality really pays off.
Generally, backpackers can get away with lower dexterity. Therefore the simple mitten-style glove is ideal because they’re cheaper to make and have fewer seams that can fail.

Waterproof mitten shells like the REI Minimalist can be worn on their own or over liner gloves. They’re easy to get on and off, have tons of room, and keep all your fingers in the same pocket to maximize warmth. Personally, I’d probably wear those shells over a thin liner glove like the Under Armour Armour Liner 2.0.
That combination of a waterproof shell and liner glove should get you through most mild cold weather on the trail.
Waterproof Backpacking Shoes and Boots
I’ll probably ruffle some feathers by including this in the “non-essential” category. At this point, the group of hikers using non-waterproof trail running shoes has grown so much that it might be more widely accepted.
Waterproof hiking footwear was once the standard operating procedure in all weather for all hikers. Somehow everyone got convinced that heavy full-size waterproof leather boots were necessary on all backpacking trips. Let’s not get stuck with that myth.
When you’re backpacking in the rain for hours, or even days, the rain will eventually get into your footwear. That giant hole in the top of your shoe or boot makes it very easy for water to get in. Once water is in, either from above or from below, some lightweight non-waterproof shoes will be lighter, more comfortable, and dry out faster than beefy waterproof boots.
As long as temperatures are above about 55 degrees Fahrenheit during your hiking day you can probably get away with non-waterproof hiking footwear.
When temperatures fall into the range where wet feet over long periods can pose a health risk you may want to consider waterproof footwear. Unfortunately, it’s usually still impossible to keep your feet dry even with the best gear. However, you may have to try at times just to avoid frostbite or non-freezing cold injuries.
I won’t make specific recommendations on brands or models of waterproof hiking footwear. Instead, I encourage you to go try them on in person and make sure the fit is right. Lightweight is always better!
Pro Tip
Try as you might, even the best waterproof gear won’t always work. One of the biggest problems with staying dry is that you’ll always sweat from the inside. Remember that whatever waterproof system you use, you’ll need to account for this. Unfortunately, there aren’t many great solutions…
To increase your chances of keeping your cold little toes safe, here are some tips:
Plastic Grocery Bags
Once your footwear soaks out you’re pretty much out of options. What you can do, however, is use a makeshift occlusive layer.
Wake up in the morning, put on a pair of dry (or dry-ish) socks, pull a grocery bag over your foot, and put the whole thing in your boot. This can help to keep your feet warm and dry for a bit by preventing water ingress. Unfortunately, you’ll find that sweat from your feet eventually gets your socks wet anyways.
One of the only workarounds for this is to take breaks often and air out your feet and socks.
When temps are cold and wet precipitation is likely I always carry several extra grocery bags for this reason. I’ve personally had them be the difference between frostbitten toes and making it out without injury in some cases.
Waterproof Socks
There are some hikers who like waterproof socks. These can actually be a decent asset in some cases, but they won’t work for everyone. Again, you’ll never keep your footwear dry in extended periods of rain or hiking through spring snow or muck. Instead, you might try to help keep your feet dryer and more insulated.
Before making waterproof socks part of your system permanently I highly recommend some short hikes with them on in wet conditions. You can get waterproof socks pretty cheap these days so don’t hesitate to give them a try.
Waterproof Gaiters
If you have some really good waterproof boots on, there’s a slim chance you might stay dry for a bit if you do it right. Layering waterproof gaiters over your boots is one way to help with this.
Personally, I like Outdoor Research waterproof gaiters. You’ll want to layer your rain pants over these gaiters to help shed water, otherwise, the rain will just run under the gaiters and into your boots. I like low-height gaiters for wearing under my pants because the taller gaiters just aren’t comfortable for this.
Safety and Waterproof Hiking Systems
Whatever gear you use and how you plan to use it together makes up a waterproof system. Every hiker has his or her own waterproof system, sleep system, packing method, and opinions. There’s no single “right” way to do it for everyone all the time.
Because getting cold and wet can be dangerous to your health, messing up your system catastrophically is probably a bad idea.
This is why I always recommend testing out your waterproof gear and cold weather gear on low-danger hikes.
In fact, setting up your gear in your backyard during a downpour and sleeping out in the rain all night is a great idea! This way if you mess it up, get soaked, and drench your sleeping bag you can always just run inside and warm up.
Once you think you’re ready, do a single overnight somewhere near home when you know the weather is going to be bad. Try walking in the rain down the trail, keeping yourself warm and dry in different temperatures, and setting up your tent by yourself in the rain out in the woods. You’ll quickly find out if you’re up to the task!
Keeping your first few hikes short means you can always fall back to the car if you have to and the real danger is pretty low overall.
Testing Gear and Methods
You will end up buying multiples of the same gear. You might start with a tent and move to a tarp. You may try rain pants and find out you prefer a rain skirt or kilt. I don’t know a single backpacker that still uses the first gear they bought.
Fortunately, you can minimize the amount of shopping you have to do. Here’s how:
Before making a purchase decision if it lines up with your personality. Do you take time to learn and understand your gear? Ultralight or advanced technologies might be right for you. Alternately, maybe you prefer something durable and robust you can just throw up anywhere, shove in your pack without concern, and call it good. More conventional, durable gear and materials might be right for you.
Consider how that new piece of waterproof gear will fit within your system. Perhaps you want to use a waterproof tarp or mid-tent. Then you can get inside and use the shelter as cover from the rain to then open your bag and get the contents out of your bag liner without getting soaked. Otherwise, maybe you prefer individual waterproof stuff sacks so you can unpack anywhere even if it’s raining.
Make sure the gear you’re buying fits your normal uses. If you only hike twice a year exclusively during the warmest months you can probably save money by using simple, inexpensive waterproof gear. Hikers hoping to set the next speed record for an AT thru-hike, however, need the most advanced gear on the market. Which of these are you? Maybe you’re somewhere in-between.
As someone who has spent thousands on top-end bleeding-edge backpacking gear, I can speak first hand. I’ve definitely bought gear or followed trends because some all-star ultralight backpacker does it. While the gear is cool, and the advice is certainly sound, often times their gear and methods just don’t apply to me.
Get advice, ask friends, go to trusted sources, and then take all that with a grain of salt as you consider what’s best for you.
After Hike Report
One method I used to improve my gear early on was to write stuff down. If I found that something didn’t quite work for me I would take notes on the trail.
Once you get off the trail you can visit Google and do some searching for solutions. You might also visit the local outfitter store and poke around until you find something that might fix your problem.
Every time you get done with a hike you should have something to improve and over time you’ll be a well-oiled mile-hiking machine!
Conclusion
When it comes to waterproof backpacking gear there’s always more. Always more gear, always more advice, and always more ideas.
Never stop learning as you enjoy the world of backpacking. There’s an incredible amount to know and many fellow backpackers are significantly knowledgable. It’s fun and helpful to observe and chat with others as you continue to improve.
No matter how basic or crazy your waterproof gear and systems are, you can always test them safely. Once you’re satisfied, you can slowly increase the difficulty and length of your hikes until everything is perfect for your needs!